
food as culture – why cooking is important to preserving identity
Preserving food-related stories, and bits of culinary background info is essential to preserving a culture.

Food has always been important to me.
Not just the consuming of it, but the cooking of it. More recently, food has grown in its importance in my mind because I’ve come to see it as a primary vehicle of culture.
How Food Defines A Culture
When you think of other cultures, there are usually 3 things that define them:
what they wear
how they speak, and
what they eat
{for example: If I were to ask you what comes to mind when you think of Indian, Japanese, and Jamaican culture – I can pretty much guarantee that – in addition to saris, kimonos and dreadlocks – curry, sushi, and jerk are going to show up somewhere in the list. }
An individual or group’s food culture is more than just what they eat for dinner, more than a single, iconic dish. Food culture is a complex mishmash of history, geography, climate and social values that go into what food is served, when, where and by whom. It’s an important way of preserving and transmitting the culture as a whole.
The Lexicon of Food’s definition of food culture summarizes it perfectly (if not succinctly):
Travel as Cultural Exchange
Travel has definitely influenced my perspective about my own food culture as an American, as a Southerner and as an African-American. After having been invited into the homes of co-workers from other cultures, or being cooked for by people I’ve met travelling, I’ve realized how important food is in communicating to someone who you are and where you come from.
I have a newfound appreciation for Sunday and holiday dinners past at my grandparents’ house, backyard fish frys and barbecues out in the country, sitting on the front porch shelling beans, patiently stirring a pot of grits, all things okra. I’ve recognized how important it is to preserve my own unique culture by knowing how to cook even a few signature recipes that are intrinsically linked to the land and the people I come from. In fact, I see it almost as a responsibility.
What Exactly is ‘American’ Food?
One particular point of dismay when I’ve traveled has been the realization that people from other countries and cultures typically think of American food as either hamburgers or pizza. It’s an unfortunate side effect of the globalization of American fast food chains, and the failure to mass export more authentic, often regional American cuisine. This misconception makes it all the more important for me to continue to hone my skills in the kitchen and add to my repertoire of true American recipes, so I, too, can share who I am and where I’m from with new friends from other cultures and parts of the world.
I challenge you to do the same.
How to Become a Food Culture Ambassador
Even if you don’t consider yourself much of a cook, take it upon yourself to learn how to prepare at least one dish that is representative of your culture. Use it as an opportunity to learn more about where you come from – to understand the connection between the ingredients used in the dish and the place it originated. Call up someone else from your culture – your mom, another person from your hometown – and ask them to give you some pointers on how to make one or more iconic cultural dishes, then invite them over for a taste. Practice making the dish until you feel proud of it, until other people start to request that you make it for their next potluck dinner, their son’s birthday party, their wedding reception. Once that happens, write your recipe for the dish down on really nice paper. Make copies of it and give them out as gifts to people who’d appreciate it.
Culture is many things – food, dress, language – and each element of culture has a story of how it came to be. Preserving food-related stories, and bits of culinary background info is essential to preserving a culture. Unlike many other countries with more homogenous populations, America has a wide and diverse range of cultures living in proximity to one another and intermingling every day. Some degree of assimilation or fusion of cultures is understandable, but when entire food cultures are abandoned for pre-packaged, mass-produced commodifications of a particular culture’s food (see: Taco Bell, Panda Express) it’s a huge loss for everyone. And since profit and mass appeal are the primary motives of food-centered corporations, it’s we individuals who must maintain the authenticity of our respective food cultures, not only for our own families, but also for those curious enough to seek it out, and those who we meet on our travels.

how to make anything you cook taste better
5 simple things even beginner cooks can do to create restaurant-quality food at home.
Since I caught the cooking bug, I’m always looking for ways to make my food look and taste better. If I’m going to take the time out to cook, I want to make the best meal I can. So whenever I cook at home, I try to come as close as possible to creating a restaurant-quality meal for myself and my guests as I can. Fortunately, that’s not as difficult as it might seem to be.
What makes a really good restaurant meal really good, generally isn’t the fact that the dish contains a lot of unrecognizable ingredients, or that the chef uses fancy cooking techniques. Instead, a really quality meal relies on some very simple cooking tips that should be incorporated into every dish.
how to make anything you cook taste better
5 Tips for Creating Restaurant-Quality Meals At Home
Use fresh ingredients
Fresh ingredients have much more flavor and texture. To make your food taste better, avoid canned or jarred goods if fresh is also available. This is especially true for vegetables.
Canned vegetables are probably to blame for many people who claim they don’t like vegetables. Canned veggies are mushy, and all of them taste kind of the same after soaking in room temperature salt water for god knows how long. In my opinion, canned food is emergency food that should really only be used under certain circumstances, namely:
When you’ve run out of everything else in the house,
When camping, or,
When the zombie apocalypse pops off.
For almost every other occasion, use fresh. Also. If you’re using that jarred diced garlic? Stop.
There are some exceptions where I think canned foods are an ok alternative to fresh, like: beans, tomatoes, fish (tuna, sardines, salmon).

How to Make Anything you cook Taste Better-flavor
Add more than just salt & pepper
While salt and pepper are the basic must-haves for seasoning food, if you want to create more complex and interesting food flavors, you absolutely need to use herbs and spices. Stock your spice cabinet with some basics, and learn how to use them in your favorite dishes to make them truly taste like something.
You can even coax more flavor out of your standard salt and black pepper. Instead of table salt, use a good quality sea salt – a tiny bit goes a long way, and you’ll find that you need to use less of it. Which is particularly helpful if you’re looking to cut back on your salt intake. Fresh ground black pepper also tastes much more flavorful and goes a lot further than pre-ground black pepper.
Combine olive oil & butter
If you’re sauteeing, pan frying or roasting something, instead of using oil on its own, combine both olive oil and butter to cook your food. There are a few benefits to this blend:
Adding butter to olive oil adds a richer, more luxurious flavor to a dish than just olive oil on its own.
The browning power of butter creates nice color and crispness on the exterior of the food.
Butter burns much more quickly than olive oil, so adding olive oil protects against over-browning or burning the outside before the food is finished cooking inside.
Since oil and butter have about the same number of calories, by combining the two, you get extra flavor without extra calories.
I recommend the olive oil & butter trick more for meats and proteins (like this recipe for perfect pan-seared salmon), than for vegetables, but if you’re one who doesn’t really like to eat veggies to begin with, go ahead and add some butter to help yourself out.
Follow the rule of 4
Try to make sure your home-cooked dish includes all of the following 4 taste components:
Salt – as mentioned previously, you shouldn’t only do salt, nor should you overdo salt, but the right amount of salt will instantly bring out the other flavors in a dish.
Sweet or savory – Dishes usually fall into either the sweet (aka, sugary) or savory (non-sugary) category. But any dish can benefit from adding sweetness or savoriness to help balance out already existing flavors. Aside from sugar, sweetness can be added to a dish with: molasses, sweet vegetables like butternut squash or sweet potatoes, and dried or fresh fruits. Ingredients that add savory flavor include: herbs, broths, soy sauce, MSG, and fish sauce.
Acid – Your tongue has bitter and sour receptors for a reason. Don’t forget about them when you’re making a dish. Adding a touch of something acidic – a squeeze of citrus, a dash of vinegar, bitters, something pickled, fresh chopped onions – to a dish creates a layer of brightness and contrast to almost any dish, whether sweet or savory.
Texture – Ok, so, technically, texture is not a component of taste. But! It’s so intricately linked to how we perceive the flavor and taste of food, that the lack or presence of texture definitely influences how good we think a dish or meal is. Words like crunchy, crispy, tender, fluffy, creamy all express texture, or, the way a food feels in your mouth. Be sure that your dish has the right texture for what it’s supposed to be.
Including all of the above flavor components in your home-cooked meals will stimulate all of the flavor receptors on your tongue, along with the sensation of texture. And that means better tasting food.

How to Make Anything you cook Taste Better-pleasure
Plate it nicely
It’s said that you eat with your eyes first. If you’re going to go through the effort of cooking, make sure you show off the finished product – even if you’re only cooking for yourself. Don’t just slop your food onto the plate, take a few minutes to arrange everything nicely and admire it for a few moments before digging in. And, dear God, please don’t serve your lovely home-cooked meal on a paper or plastic plate. I mean I get it, I don’t like to wash dishes either, but my food is better than that, it deserves a proper plate. And so does yours.
If you must eat on plastic, at least refrain from posting a picture of it on the internets. It just looks sad.
If you’ve already mastered these tips for cooking better tasting food, try these more advanced tips from Lifehacker on how to make your food taste better.
What other tips do you have for making your food taste good?
how to make chunky guacamole
Easy recipe for authentic Mexican guacamole. This chunky guacamole recipe starts with pico de gallo and includes fresh avocado.

For years, I thought I didn’t like guacamole. The bright green goo that would occasionally appear at house parties, game day gatherings and Tex-Mex restaurants held absolutely no appeal for me. I would turn my nose up at it when I saw it on display.
“No, thanks. I’m not a fan of mush,” I’d say.
Others tried to convince me that I didn’t know what I was missing out on, that I should try, ‘insert texture-less, tasteless store-bought brand name here’, because theirs was reaaaally good. I would occasionally, against my better judgement, try the green goop again. Still, I remained unimpressed.
Then, after my first trip to Mexico, I realized that most of what we call guacamole here in the US… ain’t.
What I tasted at beachside shacks and streetfront restaurants in Mexico was not a uniformly smooth green spread, it was more like an avocado salad – it had big chunks of the lovely pale green fruit; it tasted bright and fresh and was something I could literally sink my teeth into. I dug into it gleefully at every meal during my trip, amazed out how simple the mixture of ingredients was, and how unlike the ‘gwaca-mohl’ I was used to seeing and tasting stateside it was.
After returning from my trip, I was inspired to start making this chunky (and dare I say, more authentic) guacamole in my own kitchen. I’d serve it to visiting guests and carry it along to potluck shindigs. Apparently, I got pretty good at making it, since my friend Regina confided in me, “Yours is the only guacamole I’ll eat.” Apparently, she’d had the same ‘get-that-green-go-outta-here’ feelings that I’d had for years, and I had made her a convert.
So, this one is not just for you other would-be converts, it’s for Regina. And for the potluck party that she’s having this weekend that I won’t be able to attend, but my guacamole will be.
How to Make Chunky Guacamole
For me, the perfect guacamole starts with pico de gallo – a mixture of tomato, onion, cilantro, and lime juice that forms the base of the ‘avocado salad’.
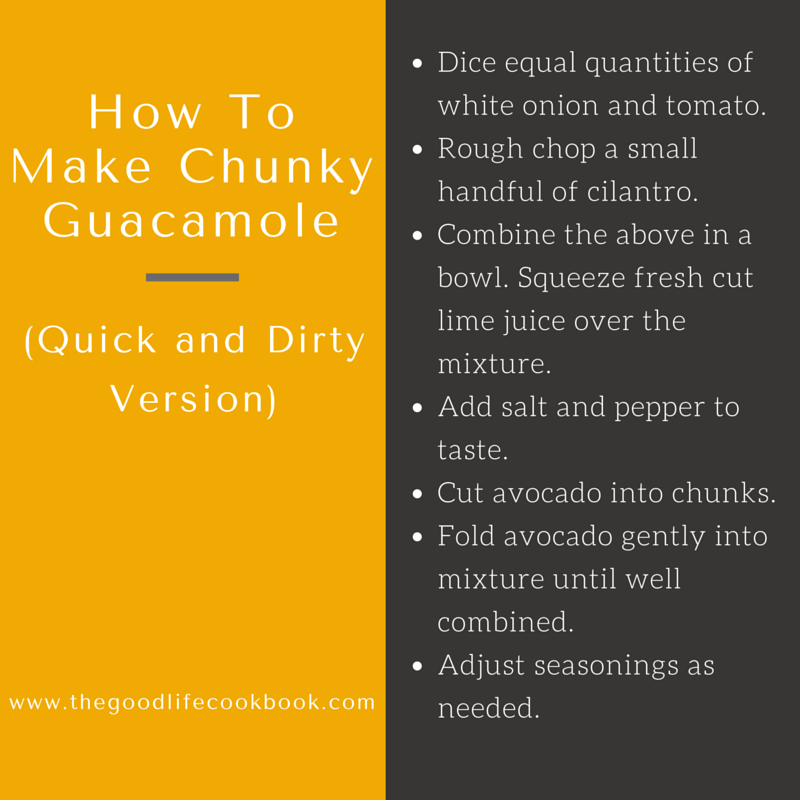
Some tips to make sure your chunky guacamole comes out perfectly:
- If you don’t yet have the technique down, figure out how to properly cut an avocado. It’ll help cut down on prep time and just make your guac look prettier in the bowl.
- Avoid using a metal bowl or spoon – metal can cause the avocados to turn brown.
- If you’re making the guac ahead of time, squeeze a little extra lime juice over the top of the completed salad (acid acts as a mild preservative), and cover with plastic wrap touching the top of the salad. This will limit the air contact that causes the avocados to oxidize and turn brown.
- Add in extra flavor to the pico as you desire – diced jalapenos, fresh(!) minced garlic, ground cumin, diced mango, finely chopped cooked shrimp. These add-ins will transform your standard guac into something even more impressive.
- Don’t stir too much once the avocado is added. This is especially important if your avocados are very ripe. The more you stir, the mushier they’ll become.
I hope you try this recipe for chunky guacamole at home, and I hope you can make some converts out of your friends who may think they don’t like guac.
Are you a lover or a hater of guacamole? Would you give this recipe a try?

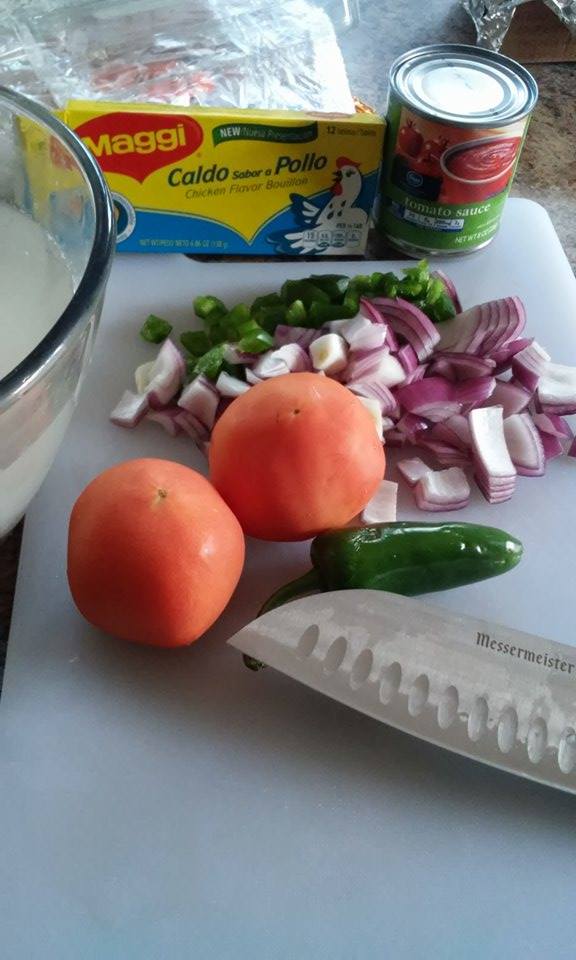
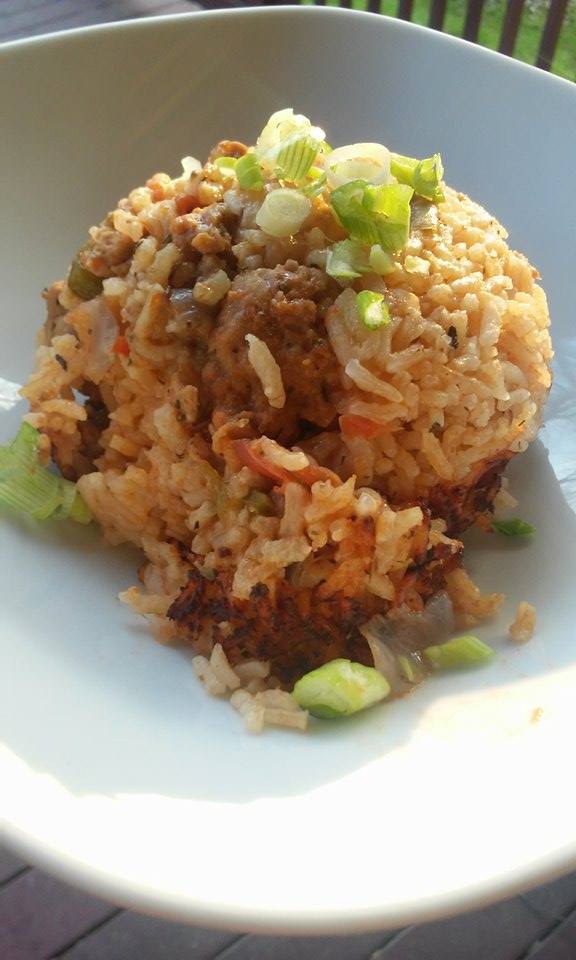
how to make jollof rice
Learn how to put a handful of common ingredients together to create a classic West African rice dish that many say is the precursor to jambalaya.
“Who taught you how to do the shopping for Jollof rice?” I’d shown up to my Ghanaian friends’ house with a bag of groceries, my thanks for them having fed me home-cooked meals multiple times since I’d been living in Malaga (and my ‘bribe’ to get them to cook again that day). Had I done the shopping for Jollof rice? Not intentionally. But that day, I learned how to put this handful of very common ingredients together to create a classic West African rice dish that many say is the precursor to Southern / Creole jambalaya.
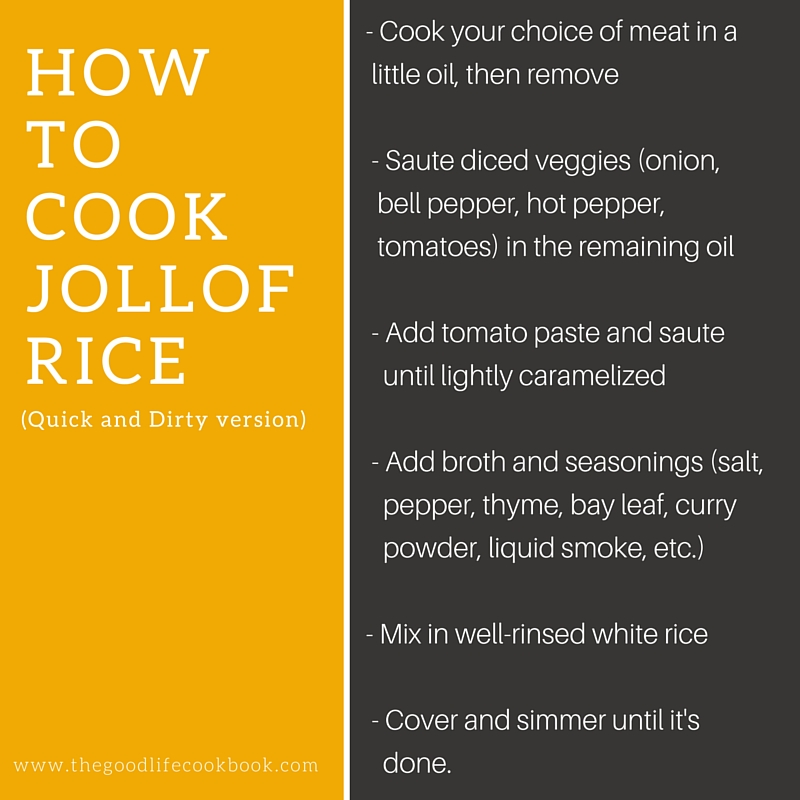
Like many iconic cultural dishes, Jollof rice has as many variations as there are cooks that prepare it. Seasonings, meats, and garnishes change according to individual tastes, the preparer's country of origin or family traditions, but one thing remains consistent: it's a boldy flavored dish that can feed a few or a crowd without breaking the bank. Despite the many stylistic differences, the steps to making Jollof rice are essentially the same in every recipe:
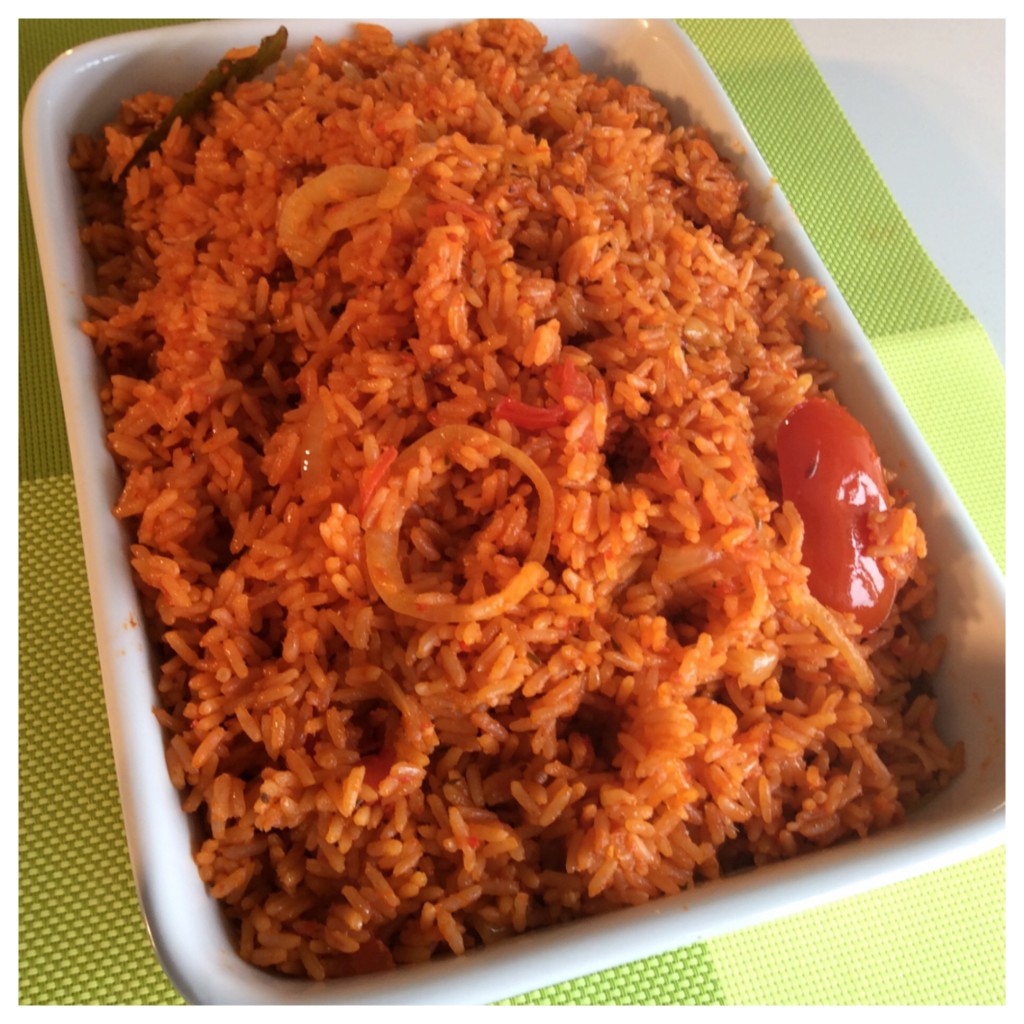
 Yet, there is one other thing though that - for me - sets Jollof rice apart from other one-pot rice dishes... the crispy bottom.
If you have never experienced the culinary and textural joy that is crispy-bottomed rice... my friend, I dare say, you have not yet lived. While West Africans aren't the only ones who finish off rice cookery by intentionally and lightly scalding the layer of rice at the bottom of the cooking vessel so it turns a crispy, golden brown (the Spaniards do it too with paella), I think they may have perfected it. Plus, the rich flavors of this dish, when combined with that crunchy layer of rice, is just... delightful.
Yet, there is one other thing though that - for me - sets Jollof rice apart from other one-pot rice dishes... the crispy bottom.
If you have never experienced the culinary and textural joy that is crispy-bottomed rice... my friend, I dare say, you have not yet lived. While West Africans aren't the only ones who finish off rice cookery by intentionally and lightly scalding the layer of rice at the bottom of the cooking vessel so it turns a crispy, golden brown (the Spaniards do it too with paella), I think they may have perfected it. Plus, the rich flavors of this dish, when combined with that crunchy layer of rice, is just... delightful.
If you fancy trying to make Jollof rice in your own kitchen, here are three recipes for inspiration:
How to Make Jollof Rice
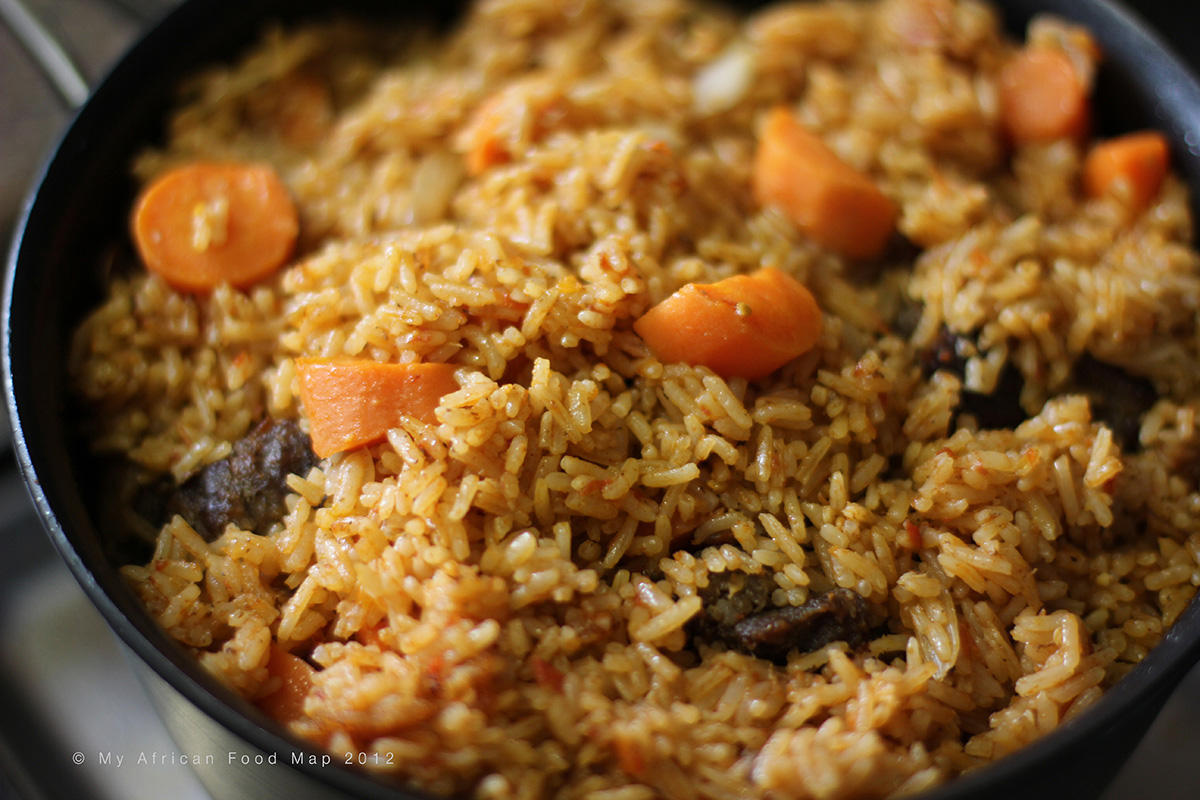
The best way to learn to make any dish is to watch someone else make it. In this video recipe from My African Food Map, Ghanaian Tuleka Prah takes us into her aunt's kitchen to learn the Ghanaian way to make Jollof rice - note the addition of extra veggies like carrots and green beans.
Another West African home cook, Sisi Jemimah, swears by the addition of butter and white pepper to get an authentic Jollof rice taste. She also shares her secret for getting that characteristic reddish color that Jollof rice is known for. She finishes her version by stirring in fresh tomato and sliced onion at the end of cooking - a touch that will add a little brightness to a dish that's heavy on rich, savory flavor.
This recipe from NigerianFoodTv gives specific instructions on how to get that coveted crispy bottom layer on the rice. It suggests parboiling the rice to help the process along, but I've gotten good results without parboiling, instead just rinsing the rice to remove the excess starch before cooking.
Have you tried Jollof rice before? What are your tips for getting the right balance of flavor, color and texture? If you haven't tried to make this dish before - give it a go... you won't be disappointed.

what to do with sh*tty wine
After the last BYOB shindig I hosted, I found myself left with 3 bottles of not-so-great wine that I knew I'd never drink. They sat collecting dust on the bar in the dining room for weeks and weeks, until I finally decided to turn to the Internets for help.
One of the best things about hosting a BYOB party at your house is all the great bottles of wine and liquor left over after the party is finished. Well... usually.
After the last BYOB shindig I hosted, I found myself left with 3 bottles of not-so-great wine that I knew I'd never drink. They sat collecting dust on the bar in the dining room for weeks and weeks. Every so often my gaze would fall on them, and I'd think, "Now what in the hell am I going to do with this wine?" Then: "And who in the hell brought this to my party anyway?" I considered re-gifting the bottles, but didn't want the recipient to get the wrong idea about my wine taste. With my luck, they'd end up thinking these undrinkable wines were my favorites and making that my next birthday present.
No thanks.
To make matters worse, the unwanted wines weren't your standard reds or whites - which I might normally work into a favorite recipe. No sir, the three I had to contend with were: a moscato, a pink moscato, and a sparkling rose with the word 'sweet' in the name. Halp.
Determined not to let even wine that I didn't want to drink go to waste, I turned to the Internets for ideas on how to transform these leftover wines into something delicious.

what to do with leftover ine
What To Do With Leftover Moscato
Moscato Poached Pears - This recipe is super simple and uses a full bottle of moscato (perfect for my needs!) along with a touch of honey to soften and flavor delicious ripe pears. The poached pears can even be sliced and saved for serving later over ice cream or yogurt.
Apples Baked in Moscato - Slow-baked apples and prunes in a wine bath flavored with vanilla, cinnamon and brown sugar? Not only is this a great way to use up some leftover moscato, it's the perfect healthy dessert for Fall.
What To Do With Leftover Rose'
Homemade Wine Jelly - While the original recipe uses red wine, I think it would work just as well with a rose' like the pink moscato I've got on hand. The original poster recommends pairing the final product with cheese and crackers, but I could see using this jelly on everything from biscuits to burgers.
Gummy Wine Fruit Snacks - This recipe also calls for red - but are you telling me you wouldn't want to tear into these sweet and boozy gummy treats if they were made with rose' instead? I didn't think so. Package some of these easy to make adult treats up and share with your friends!
What to do With Leftover Champagne
Strawberry and Champagne Pancakes - When you think champagne and breakfast, you usually think mimosas. But this recipe infuses champagne into homemade pancake batter to make them even lighter and fluffier, then tops the flapjacks with a fresh strawberry and champagne sauce.
Homemade Champagne Vinegar - The thought of making my own vinegar from wine kinda freaks me out, especially since the process involves fermentation. But since that bottle of sparkling sweet wine is going to just sit there collecting dust anyway, might as well give it a shot. Some recipes for making champagne vinegar, like this one from The Kitchn, opt for natural fermentation (i.e., just sitting the open wine in a dark place for a few weeks), while others, like this one on the Williams-Sonoma blog recommend the use of a bacterial vinegar starter or 'mother'.
More Uses for Leftover Wine
They say you shouldn't cook with wine you wouldn't want to drink. But they didn't say anything about baking with it or using it around the house. These 27 uses for leftover wine from Greatist are range from savory to sweet and even household uses

coconut curry quinoa + 5 ways to cook quinoa
A recipe for coconut-curry quinoa plus 5 more ways to use cooked quinoa any night of the week.

Weeknight mealtimes have been sort of iffy lately. Most times, I manage to plan ahead for my evening meal. Sometimes, I just wing it with what's in the fridge and pantry. Since quinoa is something I always have on hand, it makes frequent appearances alongside or underneath whatever else I've cooked. Occasionally though, I like to give the little grain some more attention. You know, zhoozh it up a bit so it doesn't always fade into the background. Here's one of my favorite ways:
Coconut-Curry Quinoa

makes about 4 servings
Ingredients:
- 2 cups quinoa (I like to use a combo of regular and black quinoa)
- small onion, chopped
- 1/2 red bell pepper, chopped
- roma tomato, chopped (optional)
- 1/2 - 1 Tbsp of curry powder (vary amount according to your tastes)
- small can of coconut milk
- 1 cup water
- 1 Tbsp olive oil

5 Ways to Use Cooked Quinoa:
- Quinoa mac-and-cheese - A more protein-packed version of the classic dish. I use the quinoa mac-and-cheese recipe from Moni's Meals as a guideline.
- Quinoa stir fry - Stir fry peas, diced carrots, diced green onions, and any other veggies you like with crushed garlic and ginger. Toss in cooked quinoa, soy sauce, and sesame oil.
- Quinoa salad - Toss cooked quinoa with diced cucumber, tomatoes, fresh basil, feta cheese, and a vinaigrette. Add more veggies and salad fixings as you like.
- Quinoa cakes - Mix cooked quinoa with beaten egg, minced shallots, and grated parmesan cheese. Shape into small cakes and pan-fry. Serve as a snack or appetizer.
- Quinoa burgers - Mix cooked quinoa with ground beef or turkey, egg, and seasonings. Shape into burger-sized patties and cook as you would cook burgers. It's a nice way to add a little whole grain to your meal.
cheers,
k
top photo: Quinoa with Chickpeas, Curry, and Lime

how to make black eyed pea salsa (inspired by crooklyn)
Spike Lee's Crooklyn paired with a new take on black-eyed peas.


Though Crooklyn is probably one of Spike Lee's lesser-known films, it's nonetheless one of my favorites. The main character of the film is Troy - a 10-year-old girl growing up in Brooklyn. Set in the early 1970s, the coming-of-age story centers around one summer where Troy encounters everything from bullying older brothers, to neighborhood dope fiends, the strange customs of Southern cousins, and tragic family loss. Even though I'm technically a child of the 80s, I was born in the 70s, so this film sparks a lot of nostalgia for me. Plus it features some very fine performances by Zelda Harris (who plays Troy), Alfre Woodard and Delroy Lindo (as Troy's parents), and a brief surprise appearance from my fairy godmother, RuPaul.
If you've seen the movie, you may remember the following comical scene involving one of Troy's brothers and his dinnertime dilemma with a plate of black-eyed peas.

This salsa would make a perfect accompaniment to grilled chicken or fish or just eaten on its own with some blue corn tortilla chips. And a big hunk of sand cake for dessert (just watch the movie, you'll get it).
cheers,
k
Watch Crooklyn on Amazon Instant Video
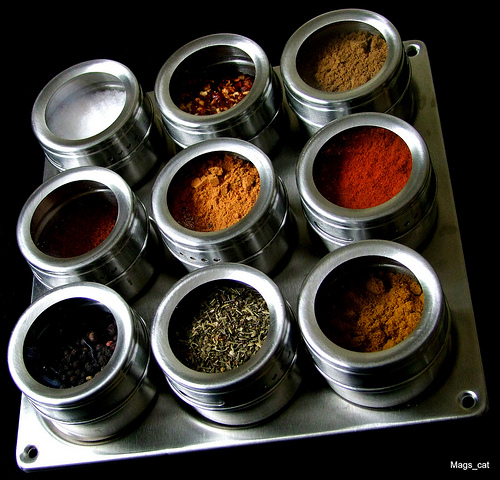
how to stock your spice rack
The spice rack is one your greatest assets in the kitchen. In this post, I show you my spice rack, offer tips on buying spices and suggest the top spices you should keep in your kitchen.


top-spice-advice
When people see my rack, the response is usually the same. Eyes bulge. Mouths water. Exclamations ensue.
Wow! That's a lot of spices! Do you really use all of those?
To be honest, I'm a barely competent home cook. I've got no special talent or sophisticated kitchen tools at my disposal. What successes I do achieve in the kitchen, I owe largely to my rack. My spices are the true source of my kitchen witchery. They are the eye of newt and toe of frog that allow me to make the magic happen, so to speak.
And even when I'm not in my kitchen, I use spices. But mostly to pass judgment on others.
Yeah, you read that right.
Whenever I go to someone's home, there are two things I use to get an instant read on who that person is: their bookshelf and their spice rack. In my mind, both are an indication of how willing that person is to experiment (with ideas or flavors) or step outside of their comfort zone.

top-spice-judge
So, to be fair, I thought I should follow the whole 'judge not lest ye be judged' advice, and reveal my own spice rack for your judging pleasure.
Here she goes:
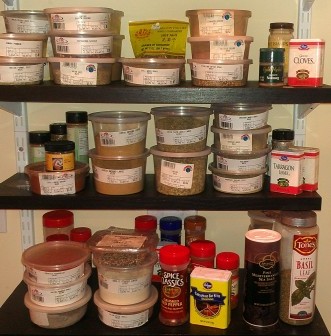
top-spice-organization
Organizing Spices
There are a lot of ways to organize spices all nice and neat-like - but I prefer a method that makes more sense for the way I cook - cultural grouping.
On the bottom shelf are the universal or 'American' spices like: salt, pepper, garlic powder, onion powder, red pepper flakes, and old bay seasoning.
The second shelf holds Latin / Caribbean spices on the left, like: cumin, chili powder, and cilantro. European spices like tarragon, rosemary, marjoram, oregano, and basil are on the right.
The top shelf has Asian spices on the left, including: ginger, szechuan peppercorn, curry powder, and anise; and sweet / baking spices on the right, like: cinnamon, nutmeg, allspice, and cardamom. And in the back are lesser-used spices like: celery seed, dill, and pickling spice.
Of course, since many spices are used in different cultures, my organization method is not a strict cultural classification, but it works for me.
Top 15 Spices Every Kitchen Should Have
Aside from salt and pepper, here are the top 15 spices I think are essential:
garlic powder
onion powder
cumin
oregano
basil
thyme
rosemary
curry powder
cayenne
chili powder
bay leaf
cinnamon
nutmeg
ginger
paprika
For good measure, I'd also suggest:
marjoram,
dill,
dried mustard, and
celery seed,
but they're not absolutely essential. As for spices you don't need, I'd say: lemon pepper, cajun spice or blackened seasoning, and seasoned salt. If you have all of the top spices I listed above, you can make your own (click the links for recipes).
Advice on Buying Spices
Stocking your spice rack can be pretty pricey, but only if you buy from major chain grocery stores. My advice is to only buy spices from major retailers in a pinch. To save money, go to an ethnic grocery store or a farmer's market (like Dekalb Farmer's Market here in Atlanta) where you can get the same spices that are often much fresher for a fraction of the cost.
Cooking with Spices
Not sure which spices or flavors go with which foods? This infographic on complementary flavors from Information is Beautiful should help.
cheers,
k
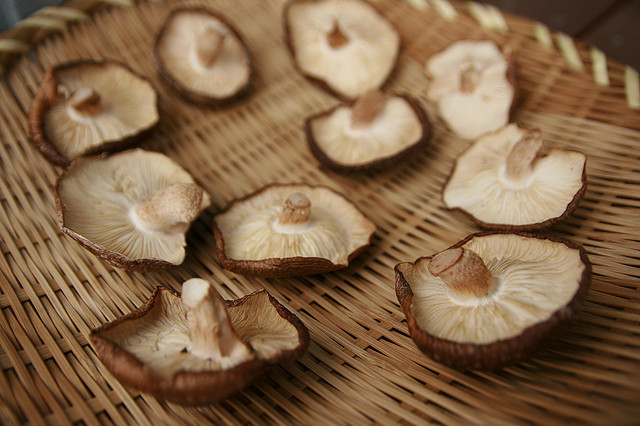
how to cook with mushroooms - 3 recipes
Plant? Mineral? Animal? You might not know exactly what category to put mushrooms in, but you can file these 3 meatless, mushroom-based dishes under quick, healthy, or delicious.

 I find that the mushroom is one of those food items that people either love or hate. Admittedly, mushrooms are a bit… creepy. I mean, after all, a mushroom is technically neither plant, nor mineral, nor vegetable, but a (gulp) fungus. And even though I fall in the ‘love ‘em’ camp, I can’t deny occasionally feeling just a bit weirded out – yet still strangely fascinated – by them. If you fall in the hate ‘em camp, I doubt I can do anything to convince you otherwise, but if you’re teetering somewhere on the edge of either camp, maybe these mushroom facts will sway you.
![]() For the past few months, we’ve been doing Meatless Mondays at my house, and mushrooms have often played a starring role in dishes where we’d normally feature meat. The benefits of using mushrooms as a meat replacement are seemingly endless: they’re cheaper, cook faster, have no cholesterol, very little fat and sodium, and are chock-full of essential nutrients like potassium, selenium, and B vitamins. All of which makes the mushroom quite magical in my eyes.
For the past few months, we’ve been doing Meatless Mondays at my house, and mushrooms have often played a starring role in dishes where we’d normally feature meat. The benefits of using mushrooms as a meat replacement are seemingly endless: they’re cheaper, cook faster, have no cholesterol, very little fat and sodium, and are chock-full of essential nutrients like potassium, selenium, and B vitamins. All of which makes the mushroom quite magical in my eyes.
Here are some of my favorite mushroom recipes:
Mushroom Quinoa Risotto (from Bon Appetit)
In this recipe, portabella and shiitake mushrooms are paired with so-called superfood quinoa (keen-wah) to create a much lighter, healthier version of a traditional risotto. It still has the rich-tasting, heartiness of risotto without the guilt or the lengthy, labor-intensive preparation, which makes it an ideal candidate for a weeknight dinner. You must try this.
Fried Parmesan ‘Shrooms over Tomato Sauce
(inspired by Lunacy Black Market)
One of the dishes I always order from my favorite Atlanta restaurant is roasted mushrooms w/crushed tomato sauce. The savory, umami flavor of the ‘shrooms and the tangy tomato sauce are enough to make my mouth water at the mere mention of the dish. When doing my own home-based version of the dish, I alternate between roasting the ‘shrooms or frying them as detailed below. This is a regular go-to dish for weekday dinners when I want to be in and out of the kitchen in less than 30 minutes.
Ingredients (serves 2-3):
4-5 roma tomatoes, chopped (you could also sub ~20 grape tomatoes)
1-2 cloves of garlic, chopped
1 shallot or small onion, chopped (optional)
Dried basil
Portabella mushrooms, washed, de-gilled and sliced into thick 1”slices (you can also buy them pre-sliced to save time)
1-2 eggs
Bread crumbs
Olive or canola oil
Grated parmesan cheese
For tomato sauce: Add a swirl of olive oil to a pot. Heat on medium-high. Add chopped garlic and shallots and sauté for 3-4 minutes, being careful not to brown garlic. Add basil and sauté for another minute. Add tomatoes. Cover pot with a lid, lower heat to medium or medium-low and let the mixture simmer rapidly for about 15-20 minutes, or until tomatoes start to break down. Stir occasionally and mash tomatoes so that they meld with the other ingredients. You want to end up with a chunky sauce. Salt and pepper to taste, then remove from heat.
For mushrooms: Beat egg well in a bowl and place mushrooms in bowl. Toss mushrooms well to coat with egg. Place bread crumbs in a small paper or plastic bag. Add egg-coated mushrooms to bag and shake well to coat with breadcrumbs. Add enough oil to pan to cover bottom of – about 2-3 Tbsp – or if you prefer, you can use more oil to deep-fry mushrooms. Heat oil on medium-high. When oil is hot, add mushrooms one at a time, making sure not to overcrowd the pan. Cook until mushrooms are golden brown on one side, then flip and cook until golden brown on the other side. Remove and drain on paper towel. Sprinkle immediately with grated parmesan. Place a few spoonfuls of tomato sauce on a plate and place a few mushrooms on top of sauce. The mushrooms are also really good over a salad of dressed mixed greens, or eaten by themselves.
Mushroom, Goat Cheese, and Arugula Flatbread Pizza
(inspired by Wrecking Bar Brewpub)
Everybody loves pizza. Unfortunately, pizza doesn’t love everybody. Your typical pie is nothing more than a cheese  delivery system, and is usually topped with fatty meats and salt-laden sauces, and bottomed with a waistline-wrecking white-flour crust. But it doesn’t have to be that way, I promise. The Wrecking Bar, a delightful little gastropub in Little Five Points, serves a version that features 3 types of mushrooms and a healthy smattering of peppery arugula. Here’s how I replicate the dish at home (or in my office toaster oven).
Ingredients (serves 2-3):
Lavash or other flatbread (preferably whole-wheat)
Goat cheese (a soft, spreadable one)
3-4 of each of the following mushrooms, chopped: oyster, shiitake, portabella or baby portabella
Handful of fresh arugula
Olive oil
Spread goat cheese onto flatbread. Evenly distribute chopped mushrooms over goat cheese, then add arugula on top. Drizzle with olive oil. Place in 400 degree oven for about 5 minutes, until arugula is wilted. Salt and pepper to taste. You could add more flavor by adding roasted garlic, pesto sauce, sundried tomatoes, or fresh herbs (basil, sage, thyme) before the pizza goes into the oven.
I hope these recipes encourage you to experiment with mushrooms. If you’re the really adventurous types – I recommend trying some of the more exotic varieties like porcini, shiitake, oyster, hen of the woods and enoki. The taste of those varieties is much richer and more complex than the more common white button or portabella mushrooms. And if you choose to experiment with magical mushrooms outside of the kitchen, well… that’s totally up to you. ;)
cheers,
k

how to get sexy with food
A full frontal exploration of food and sex, including: erotic foods, sexy food scenes, and stimulating food scents.


In a recent article on this here blog, I mentioned that eating was one of the few activities that engages all 5 senses at once, and that travel was a close second.
Well Dear Reader, once again, I have something to confess. My Southern demureness (and the fact that my Mom occasionally reads this) kept me from truthfully asserting my real choice for 2nd place in the 'stimulates-all-your-senses' category... Sex.
There. I said it. Sexsexsexsexsexitysex...sex! Have you clicked away yet? Unsubscribed? Fine. Better do it now before we really pass the PG-13 zone (Yes, mom. That includes you.).
So, why the change of mind?
After reading a recent Creative Loafing article on the eroticism of food, I was emboldened by this quote from chef-cum-prophet Paul Luna:
"Sexuality and erotica play essential roles in exploration and self-discovery. These elements seem to be culturally suppressed in Atlanta and Southern culture — at least, overtly."
Well, I'll be.
Not one to be restricted by the often prudish Southern attitudes towards either food or sex, I decided to take Chef Luna's quote as a challenge to overcome my own self-repression and explore - in one fell swoop - the various facets of the food-sex connection. I hope it's as good for you as it was for me.
Erotic Foods
The most commonly cited erotic foods are usually ones that resemble certain parts of the human anatomy, such as: asparagus, bananas, figs, and pomegranates. But you already know about those, so let's indulge in a few lesser-known sensual foods.
Mole (pronounced, mole-ay) - A Mexican sauce that comes in as many varieties as there are sexual positions (well, almost). When prepared from scratch, it's a labor of love that typically combines rich chocolate with chiles and spices  like cumin, and cinnamon. Like most new adventures in bed and out, mole might take some getting used to, but if you find it's not for you, you can always go back to more tried-and-true tastes.
Peel-and-eat crawfish - The well-known instruction to 'pinch the tail, suck the head' is sexy, albeit in a somewhat juvenile way. But hey, silly can be sexy too. Plus, any eating experiences that requires tearing at food with your hands, getting your fingers all messy and sucking your digits clean can be a real turn-on. Of course, you're not limited to crawfish. Try other peel-and-eat seafood, fresh cut fruit, Moroccan or Ethiopian food, or, for you prudish Southern-folk, barbecue.
Truffles - Truffles have an earthy, mouth-watering flavor, but they can be both hard to find and very pricey. As an alternative to whole truffles, a bit of sprinkled truffle powder or drizzled truffle oil can transform a conservative dish into something downright decadent.
Mango - This one has highly personal significance. I dated a gent once who literally made me blush at his method of consuming every fibrous piece of a whole fresh mango, all the way down to the pit. But even if your mang0-masticating skills aren't as... entertaining, the fruit itself - with its blushing exterior, brightly colored flesh, and exotic fruity flavor - is enough to titillate.
Sexy Food on Film
Like Water for Chocolate
Tampopo
The Cook, The Thief, His Wife and Her Lover
Eat, Drink, Man, Woman mptuous family feasts as a constant backdrop.
9 1/2 Weeks
Oh, and let's not forget the erotic scene from The Matrix:Reloaded in which the Merovingian delivers a sexy slice to an unsuspecting diner (extra points for both Monica Belluci's appearance and her character's name: Persephone).
Food, Sex, and Song
According to an article in Psychology Today, the link between food, sex, and music isn't circumstantial, it's scientific. Here are some sexy food-centric sounds to get you in the mood.
Ungodly Fruit - a sensual, lilting instrumental from Wax Tailor.
The Sensual Woman - Jello makes a notable appearance in this slickly sexy song from the soundtrack of Snatch (warning: some explicit language).

Sweet, Sticky Thing - a classic from the Ohio Players album 'Honey'.
Kelis' Milkshake - Yeah, I did it. So what? You need the Vitamin D.
And for a song that seems to be a song about food that's really about sex but is really about neither, D'angelo's soulful ballad 'Brown Sugar' takes the cake.
You might also want to check out my YouTube playlist: music to cook to - lots of spicy, savory, and sweet sounds for heating things up in the kitchen or any room of the house.
Food Scents that Stimulate
Some food scents are so arousing, you might even call them 'olfactory Viagra'. But these scent-ual smells don't have to be confined to the kitchen. Scented candle, oils, and scrubs are perfect ways to bring the smell of your favorite foods into the boudoir.
Coffee - Even if you don't enjoy drinking this stimulating beverage, the scent of a fresh-brewed pot or freshly ground beans is quite invigorating, even arousing. Maybe that's the reason so many first dates happen at coffee shops? Or maybe it's because coffee and sex have been inexplicably linked since the 16th century. If you really like the scent of coffee, a quick home-made body scrub of ground coffee and olive oil is an easy way to be enveloped by the aroma all day long.
Vanilla - a comforting smell whose soothing, calming effect could ostensibly make your sweetheart more open to your advances. It's also alleged to stimulate the production of the sex hormones testosterone and estrogen.
Japanese Quince - Some historians believe that the apple referred to as 'the forbidden fruit' in the Garden of Eden was actually a quince. Ancient Greek mythology associates the quince with Aphrodite, the goddess of love. While I can't tell you what a quince tastes like, I can tell you what one smells like. Well, kinda. The japanese quince scented products from Seda France
cheers, k
title photo:Food is sex by Mr. dale, on Flickr

my essential kitchen tools
essential tools of the craft for today's kitchen witches and wizards.


A practitioner is only as good as the tools he uses to produce his work. Since I fancy myself a kitchen witch, I thought I'd share some of my favorite tools of the craft that help make cooking easier, faster, and more enjoyable.
My Essential Kitchen Tools
- Non-stick cookware w/matching lids - Non-stick cookware makes cleanup easy, and because of that, my set of non-stick pots and pans are my everyday go-to cooking tools. While it isn't necessary to have a full set (you might even come out better with mix-and-match pieces), it is advised to spend a little extra for quality non-stick cookware that won't chip and peel as soon as you start using them. For the basics, I recommend a large pot (suitable for pasta and soups), a medium-sized saucepan and a large skillet.
- Rubber spatula - A must-have for cooking on non-stick cookware so you don't damage the non-stick coating.
- Stainless steel skillet or saucepan - To make a quality sauce, you have to get some caramelization on the bottom of the pan. Same goes for searing meats. This simply cannot be achieved with non-stick cookware. A single 12-inch saute or fry pan should be enough for most kitchens.
- Metal spatula - A must-have for scraping the caramelized bits (or fond) from the bottom of stainless steel pans. Never, ever use it on non-stick cookware.
- Baking sheet - I prefer metal baking sheets which help caramelize roasted vegetables and meats. For easier cleanup or non-stick baking, I line the sheet with foil or parchment paper. If you only have one, I'd recommend one with a lip or raised edge to keep food or juices from sliding off into the oven.
- Rectangular baking dish - Perfect for casseroles and cobblers.

- Tongs - Like having a heatproof pair of hands. Ideal for handling items in hot oil or water and for turning meats without piercing the skin and letting precious juices escape.
- Peeler - Why torture yourself trying to peel fruits and vegetables by hand? A peeler makes quick work of the task.
- Mandolin - While this isn't an everyday tool, it comes in handy when I need thin, evenly-sliced veggies for salads. Works like a charm when making homemade potato chips.
- Mini chopper - While I do own a large food processor, I rarely use it because it's so big and I'm not usually chopping huge amounts of food at once. My 4-cup mini-chopper is more practical for finely chopping fresh herbs and veggies when making sauces, salad dressings, salsas, soups and stews.
- Chinese skimmer - This handy tool is great for removing fried items from oil and for removing pastas (like ravioli, farfalle, etc.) or vegetables from boiling water.
- Latex gloves - I keep a supply on hand for messy manually-intensive tasks like forming meatballs, and for dealing with raw meats and poultry. Be sure to use the non-powdered variety.
 Mortar and pestle - Some folks swear by their spice grinder. For me, a good stone mortar and pestle are all I need to grind up a small amount of dried herbs or spices.
- Wok - Honestly, if I could only have one piece of cookware, it would be a wok. It's versatile enough to use for boiling, stewing, frying, steaming, and even for popping corn. I have 3 in my cabinet, but prefer the hand-hammered steel one to the 2 non-stick ones.
- 2-3 good knives - Nothing makes prep more enjoyable than a good quality, sharp knife. There's no need to get that variety set that comes in the wooden knife block, since you won't use half of them. An 8-inch chef's knife and 1-2 smaller knives (a 6-inch and/or a paring knife) are more than adequate for most kitchen tasks. Henckel's or Wusthoff are recommended brands. The quality is well worth the price. You'll have these forever.
- 2 cutting boards - I recommend at least 2 cutting boards - 1 for raw meats and 1 for veggies and other cutting tasks. Wood or plastic is up to you, but glass cutting boards can dull your knives faster.
- Knife sharpener - Your knives will get dull over time. To save the hassle of having someone else sharpen them and to protect your investment, get yourself a simple sharpener.
- Utility scissors - Couldn't spatchcock a chicken without 'em! They also come in handy for clipping fresh herbs.
- Whisk - How else are you going to whip cream or make stiff peaks out of egg whites? A standard wire balloon whisk should be sufficient.
- Stick / hand blender - I mostly use mine for making smoothies, but it's a godsend when I need to puree a soup.
- Wire colander/strainer - A must-have for draining pasta, beans and other items. Can also do double-duty as a sifter.
- Measuring cups / spoons - I hardly follow exact measurements when cooking my own recipes. But when
 following someone else's or on the rare occasions when I bake, measuring cups/spoons are absolutely necessary.
 - Parchment paper - As I mentioned before, I don't bake often, but baking cookies and brownies on parchment reduces the risk of burnt-bottom (I mean, unless you're into that) and makes cleanup much, much easier.
- Aluminum foil - See #5 and #23.
- Set of kitchen towels - When cooking, my hands are constantly getting dirty and constantly getting rinsed or washed between steps in the cooking process. One of the first things I do before cooking is make sure I've got at least one towel on hand. Most times I tuck it into my back pocket or toss it over my shoulder, so I have easy access to wipe or dry my hands or whip it out for more heavy-duty uses. In a pinch, I also use my kitchen towel to handle hot pans or lids.
photo 1: Auxillary home kitchen tools. by Special*Dark, on Flickr photo 2: Baking Dish 2/14/11 by esimpraim, on Flickr photo 3: mortar & pestle by ani!, on Flickr photo 4: my fancy new measuring cups by knittygurl, on Flickr

how to make green chicken chili
Want a change of pace from traditional beefy red chili? Try this recipe for chili verde that uses chicken, green tomatillos, and white beans.

There's a great brewpub in East Atlanta called The Midway Pub. They've got an amazing selection of craft beers on tap and an even more amazing patio. When I lived in the neighborhood, I'd end up eating or drinking there an average of 3-4 times a month. The vibe of the place is casual, slightly hipster (Okay, okay. Reeeally hipster), and reasonably priced. You know, the sort of place that you might end up at on a chilly winter day, packed into a booth with some really good friends, ordering round after round of intriguing beer selections. On such a day, I found myself in between rounds and in need of some stomach-lining, soul warming fare. Since few things go better with beer than chili, I ordered a cup of Midway Pub's green chicken chili (aka, chili verde). It was so good, that I decided right then and there to master my own version of the dish.
Since then, my green chicken chili has shown up on my own dinner table, at the office, on a cabin trip with friends, and at the neighborhood chili cookoff. Each time, I've gotten very positive reviews about this decidedly different take on traditional red chili. In fact, I now prefer it to traditional red chili.
Chicken Chili Verde (aka, Green Chicken Chili) Recipe
Ingredients:
2-3 lbs Boneless, skinless chicken thighs 
4-5 Poblano peppers
1-2 16oz jars of green tomatillo salsa (aka, salsa verde)
1 12-14 oz jar of corn salsa (or substitute an equal amount of frozen corn or canned creamed corn)
1-2 cans of cannellini (aka, white kidney) beans
1 bunch of cilantro, roughly chopped
5-6 cloves garlic
1 large white onion, roughly chopped
2 bunches of green onion, roughly chopped
1 cup chicken broth
Seasoning mixture: cumin, garlic powder, dried cilantro or oregano, onion powder, black pepper
1 lime, juiced
1 Tbsp olive or canola oil
salt, to taste
Optional Ingredients:
1 can petite diced tomatoes or fresh chopped tomatoes
1 can chipotle peppers in adobo
cornstarch
soft corn tortillas
Kitchen Tools:
Food processor or mini chopper
Large pot
Large bowl
Kitchen shears
Set oven broiler to 500 degrees.
Slice poblanos in half. Remove stem, seeds, and membranes. When oven is to temperature, place poblanos on top rack, skin side up and broil on all sides until skins turn black. Remove peppers and place in a plastic zipper bag. Close bag tightly and let peppers rest/steam for 10-15 minutes.
Chop white onion into rough chunks. Set aside.
Rinse and pat dry chicken thighs, coat liberally with seasoning mixture. Set aside.
Add cilantro, garlic and green onions to food processor and process until the mixture is finely chopped.
Add olive oil to pot and heat on medium. Add half of cilantro mixture and all of white onion to pot. Sprinkle with remaining seasoning mixture and stir to combine. Sweat vegetables for about 5 minutes.
Add chicken, lime juice, and chicken broth to pot. Bring to a gentle boil, and let cook for about 10 minutes or until chicken is just tender. Using tongs or a fork, remove chicken from pot, and place in large bowl to cool.
Turn pot to high and boil remaining broth on high until it reduces by half.
Remove roasted poblanos from bag. Peel and discard blackened skins. Chop poblanos.
Once chicken is cool enough to handle, cut chicken into bite-sized pieces using kitchen shears or shred by hand. Return chicken to pot and reduce heat to medium-low.
Add salsas, remaining cilantro mixture, and chopped poblanos to pot. If you’re using chipotle, add a couple of teaspoons of the adobo sauce to the pot (you can add the chipotle peppers too, depending on how spicy you want the chili). Cover and simmer on medium-low for 20-30 minutes.
In the meantime, drain cannellini beans in a strainer and rinse well with water. Add about a cup of the cannellini beans to food processor and process to a paste. Add beans and bean paste to pot, stir to combine. If you’re using diced tomatoes, add those as well. 
If chili is not as thick as you want it, mix a small amount of cornstarch with hot water in a small bowl and add the mixture slowly to pot, stirring until chili reaches desired consistency. Add salt to taste.
Remove from heat and serve with tortilla chips. Garnish with cilantro, green onions, and/or your favorite shredded cheese. And… a spoon. A really, really big spoon.
Note: If I'm really in the mood, I'll fry my own tortilla chips to go with the chili. They taste so much better than store-bought and are worth the extra effort. To make: Cut corn tortillas into quarters. Heat 1 Tbsp of olive or canola oil in a large skillet on medium-high. Fry cut tortilla for about 1 minute on each side, or until lightly browned. Remove and drain on paper towels. Sprinkle with salt and cumin powder or any remaining seasoning mixture.
cheers,
k
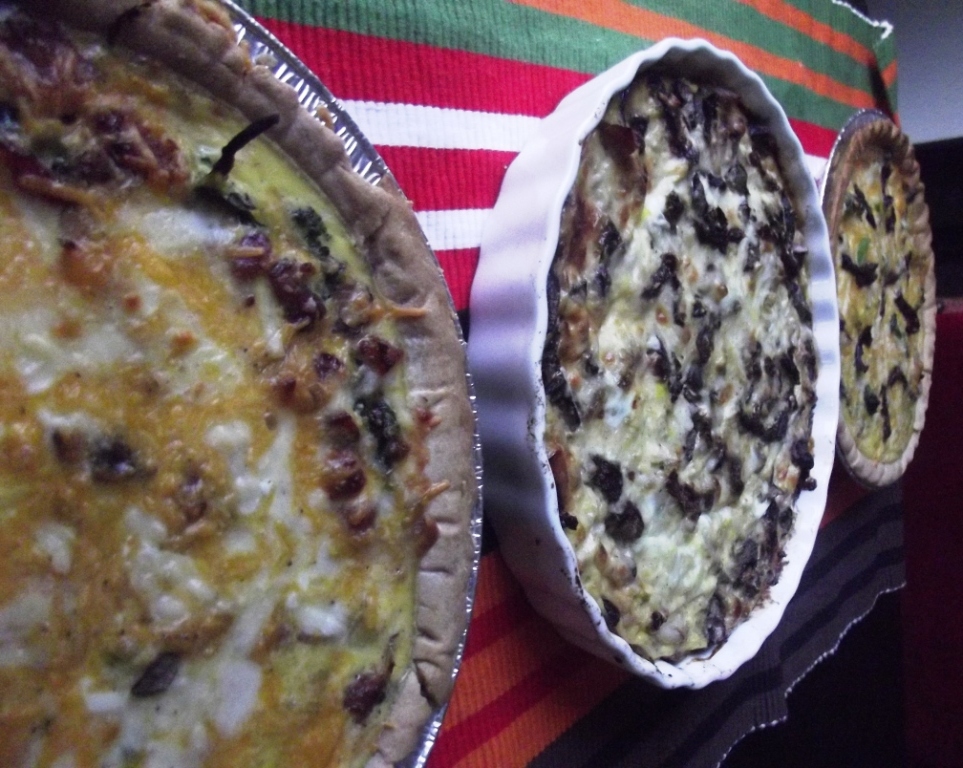
quiche recipes using holiday leftovers
Need a creative way to use holiday leftovers? Make a quiche. Heck, make three! Try this easy recipe for Christmas leftovers.

Part of my holiday ritual is to visit close friends after I’ve had dinner with my own family. It’s a time for me to catch up with my non-related loved ones. It’s also a great opportunity for me to sample holiday dishes from other families whose traditions and flavors may be just a bit different from my own. Invariably, by the time I’ve finished my rounds, I’ve got more than one to-go plate piled high with Christmas dinner staples like ham, turkey, and cornbread dressing (Note: I’m Southern. We don’t do stuffing).
This year, instead of letting those leftovers go to waste in the fridge, I decided I’d whip up a few quiches with what I scavenged from the multiple Christmas dinners that I dropped in on.
with my non-related loved ones. It’s also a great opportunity for me to sample holiday dishes from other families whose traditions and flavors may be just a bit different from my own. Invariably, by the time I’ve finished my rounds, I’ve got more than one to-go plate piled high with Christmas dinner staples like ham, turkey, and cornbread dressing (Note: I’m Southern. We don’t do stuffing).
This year, instead of letting those leftovers go to waste in the fridge, I decided I’d whip up a few quiches with what I scavenged from the multiple Christmas dinners that I dropped in on.
With a little help from some ingredients I already had on hand, I was able to make 3 different quiches. I strongly recommend you try at least one to make use of your own Christmas leftovers.
Ingredients:
2-3 cups of leftover cornbread dressing or stuffing OR 2-3 prepared pie crusts
12 large eggs
2 cups of half and half, heavy cream or condensed milk
1 tsp of nutmeg
1 tsp of cayenne pepper
salt and black pepper to taste
2 cups of shredded cheese (I had remnants of cheddar,
mozzarella, and jack in the fridge)
leftover turkey and/or ham, diced
1-2 cups broccoli, chopped
1/3 to ½ cup of sun dried tomatoes, chopped
1-1 ½ cups baby portobella mushrooms, chopped
2-3 cloves garlic, minced
½ medium onion, diced
large handful of spinach leaves
1 Tbsp olive oil
Preheat oven to 400 degrees. If using dressing, press dressing into bottom and sides of a tart pan or pie tin. If using pie crust, roll out pie crust into pan or tin. Place pan into oven and bake for 15-20 minutes or until pie crust or stuffing is golden brown. When finished baking, let rest for 5-10 minutes, then lower oven to 375 degrees.
While crust is baking, prepare egg base for quiches by mixing eggs and cream or milk together in a large bowl. Add cayenne, nutmeg, salt and pepper. Stir to combine.
Heat olive oil in a skillet on medium high. Add garlic and onions and sauté for 3-4 minutes. Add broccoli and cook for another 3-4 minutes. Add half of mushrooms, then spinach, and cook until spinach is wilted. Drain any liquid from the pan.

Turkey and Dressing Quiche:
Add chopped turkey, sun dried tomatoes, and other half of mushrooms to cooled crust. Top with about ½ cup of shredded cheese. Fill crust about ¾ of the way with egg mixture. Bake in 375 degree oven for 25-30 minutes or until firm with a slight jiggle in the center.
Broccoli, Mushroom, Spinach Quiche
Add cooked broccoli mixture to cooled crust. Top with about ½ cup of shredded cheese. Fill crust about ¾ of the way with egg mixture. Bake in 375 degree oven for 25-30 minutes or until firm with a slight jiggle in the center.

Ham + Broccoli, Mushroom, Spinach Quiche
Same as above, but add chopped, leftover holiday ham along with cooked broccoli mixture.
cheers,
k

stone soul christmas playlist
Get into the Christmas spirit with a little Christmas soul. A hand-picked playlist of funky and soulful Christmas tunes.

If you're anything like me, you're probably fed up with all of the treacly department store and easy listening Christmas music you've been hearing for the past month or longer. Actually, according to the graph below, it seems most of us have been listening to the same tried-and-true Christmas songs for 50 years or more.

I think it's high time we change that played-out record. Don't you?
With that thought in mind, I put together the 'Stone Soul Christmas' playlist featuring 26 tracks of soulful, funky, and bluesy Christmas songs. Have a listen:
This music selection is ideal for:
Those who love Christmas music, but want to add a little more spice to their holiday music selection.
This musical selection pairs perfectly with:
Wrapping gifts on Christmas Eve, cooking dinner on Christmas day, sipping hot toddies, snuggling by the fire, and getting down under the mistletoe.
holiday cheers,
k
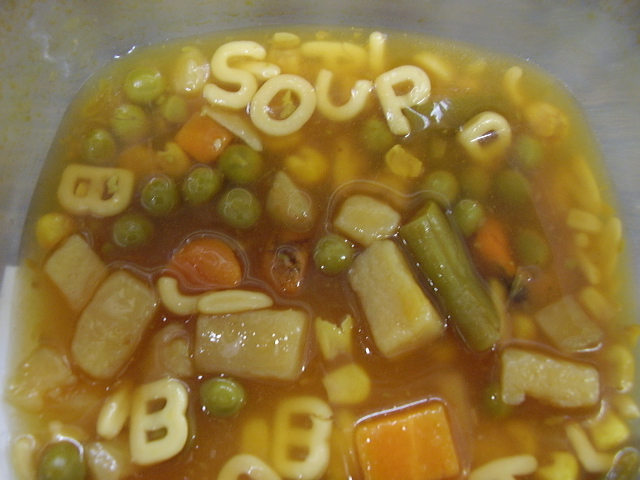
3 simple soup recipes your grandma would be proud of
3 simple soup recipes: lentil soup, curried butternut squash soup, and easy Vietnamese pho ga. Perfect for staying warm during the winter months.


"As the days grow short, some faces grow long. But not mine. Every autumn, when the wind turns cold and darkness comes early, I am suddenly happy. It's time to start making soup again." ~Leslie Newman
As a kid, the return of cold weather meant one thing: the return of my grandma's soup. My grandmother's soup was slightly different each time depending on what leftovers remained from that week's cooking. Sometimes there was beef, other times chicken, and occasionally, only vegetables - but it was always the gut-and-soul warming concoction I needed to make me feel that all was right with the world. A big bowl of grandma's soup along with a perfectly grilled cheese sandwich equaled toe-curling goodness.
As much I used to enjoy soup eating, soup making wasn't something I ventured into until fairly recently. I think somewhere along the way I convinced myself that only grandmas could make good tasting soups, and that I should steer clear of such foreign territory. In reality, though, soups are fairly easy for even novice cooks. And they're an excellent way to make a meal that's quick, budget-friendly and full of feel-good flavor. Plus, soups are universal. Every culture has at least one signature recipe for slow cooked veggies and meats in savory broth that's a beloved dish at almost any dinner table.
The basic formula for most soups is the same. Step 1: Saute or roast aromatics and seasonings. Step 2: Add other ingredients. Step 3: cover with liquid. Step 4: Bring to a boil, or simmer until everything reaches desired texture and flavor.
As Ina says, "How easy is that?"

Here are 3 of my favorite soup recipes that any grandma would be proud of.
Lentil Soup with Root Vegetables
 Ingredients:
2 Tbsp olive oil 2-3 stalks of celery 1 medium onion 2 cloves of garlic ground spice mixture (1 Tbsp cumin, about 1 tsp each of: cinnamon, nutmeg, cardamom, paprika) 2 cups of green lentils root vegetables: your choice of carrots, parsnips, and/or potatoes 6 cups vegetable broth or stock salt and black pepper to taste Optional (but highly recommended): 2-3 leaves of fresh culantro (not cilantro)
Chop or thinly slice all of the vegetables and the garlic (chopped veggies give a more homestyle feel; sliced veggies, a more refined one). Heat olive oil on medium high in a large pot, and add celery, onion, and garlic. Saute until onions begin to turn translucent. Add ground spices and saute for a minute, stirring constantly so you don't burn the spices. Add remaining vegetables and lentils and stir to combine all ingredients. Add enough vegetable broth to cover everything. Bring to a boil, then turn heat to low. If using culantro, add to the soup. Cover and simmer until vegetables are tender and lentils are cooked through (about 40 minutes to an hour), adding more broth as needed. Stir occasionally during cooking. Add salt and pepper to taste before serving.
Why you'll love this soup: It's very low effort. It's 100% vegan so you can feel good about eating it. The blend of spices gives an earthy Middle Eastern flavor that's exotic without being weird.
Curried Butternut Squash Soup
Ingredients:
olive oil salt and black pepper 2 medium onions, chopped 1 not-so-sweet red apple, peeled cored, and chopped 2 stalks of celery, chopped 1 carrots, peeled and chopped 3-4 butternut squash (about 3 lbs) 1 Tbsp curry powder 1/2 Tbsp ground ginger 2 tsp garlic powder approx. 5 cups chicken broth or stock special tools: blender, immersion blender, or food processor for garnish (use any or all): chopped green onions, chopped cilantro, dried cranberries, coconut flakes, chopped cashews
Preheat oven to 425 degrees. Cut each squash in half lengthwise and remove seeds/pulp with a spoon. Drizzle chopped veggies, apple, and squash halves with olive oil and sprinkle with salt and pepper. Place chopped veggies and apple on 1 baking sheet and squash on a separate baking sheet, skin side up. Place in oven and cook until very tender (about 20 minutes for apple/onion and 45 minutes to 1 hour for squash). Allow roasted ingredients to cool. Scoop out squash flesh and add to blender or food processor with roasted ingredients, and about 1 cup of chicken broth. Depending on the size of your blender or food processor, you may have to do this in batches. Blend mixture until you have a puree. In a large pot, heat olive oil on medium high and add curry powder and ginger. Saute for 1 minute, then add squash puree and enough chicken broth to reach desired consistency. Heat on medium until warm. If you're using an immersion blender, add all of the roasted ingredients to the sauteed curry powder / ginger mixture in the pot. Cover with chicken broth. Bring to a boil, then turn heat to low. Cover and simmer for 10-15 minutes. Remove from heat and blend in the pot until you reach the desired consistency. Add more salt and pepper to taste. Serve with garnishes on the side.
Why you'll love this soup: The color is beautiful. If you're used to sweet butternut squash soups, you'll enjoy this savory alternative. You can customize the flavor and texture to your heart's content with the garnishes.
Easy Vietnamese Pho Ga (Chicken Pho)
 Ingredients:
olive oil 2 medium onions 3 slices of fresh ginger 6-8 cups of chicken broth 1 tsp of fish sauce 16 oz rice noodles (or angel hair pasta) 1-2 cups cooked, shredded chicken (preferably dark meat) for garnish: thai basil leaves or chopped cilantro, sliced jalapeno, chopped green onion, lime wedges, chili sauce (sriracha), bean sprouts
Preheat oven to 400 degrees. Peel onions and cut into quarters. Drizzle with a little olive oil. Place onion and ginger on baking sheet in oven. Roast for 20-25 minutes or until lightly browned. Meanwhile, bring a large pot of water to a boil, and cook rice noodles (or angel hair) according to package directions. Place cooked noodles into 4 separate bowls. In a separate pot, add chicken broth and fish sauce and heat on medium-low. When onion and ginger are roasted, add to chicken broth. Heat on medium-low for 15 minutes. Add a small amount of chicken and each garnish to each bowl on top of cooked noodles. Ladle hot broth into each bowl (leaving onion and ginger in the pot) and serve with extra garnishes on the side.
Why you'll love this soup: It has everything you expect from traditional chicken noodle soup with a decidedly non-traditional flavor. It tastes almost as good with or without the chicken in the soup. It's even easier to make than the other two soups above.
cheers,
k
photo: Vegetable soup by Lottery Monkey, on Flickr

amuse bouche: hosting a dinner party
The single most important ingredient for a great dinner party.


"As W.S. Gilbert said, 'When planning a dinner party, what's more important than what's on the table, is what's on the chairs.' " ~ from, "Giving a Dinner Party (I)" in Life Is Meals: A Food Lover's Book of Days
I sometimes imagine the afterlife as a decadent feast that never ends. Only in heaven, you're surrounded by all the wonderful people you love, and in hell, you're surrounded by all the awful people you hate. The finest meal can be a misery if the wrong people are at the table. And last night's leftovers becomes a royal banquet when shared with pleasurable company. The best dinner parties are those where each person brings their own special something to the table, yet everyone shares a common trait: the ability to just let go and savor the moment.
cheers,
k

how to make spatchcock chicken
Giggle if you want. This recipe for spatchcocked chicken might be the best meat you ever put in your mouth.


the-sound-table-spatchcock-chicken
I first had spatchcock chicken a little over a year ago at The Sound Table in Atlanta. The dish was most impressive because of its simplicity - cuts of bone-in chicken, with an herby-citrusy flavor and a nice char on the skin. Determined to recreate the dish at home, I searched the interwebs and discovered that the term 'spatchcock' had nothing to do with how the meat was flavored, and everything to do with how the meat was cut.
Put simply, to spatchcock means to remove the spine or backbone of the bird in preparation for oven or grill roasting. Spatchocking is actually the more formal cooking term for butterflying. The whole point of spatchcocking is to allow even cooking of both white and dark meat portions of the bird. As anyone who has roasted a whole bird knows, it can be near impossible to have juicy, fully-cooked thighs and legs without also ending up with dry, overcooked breasts and wings.
Get your head out of the gutter, please.
Since my first taste, I've spatchcocked my fair share of birds. I even spatchcocked last year's Thanksgiving turkey - it cooked in record time and was the most flavorful roasted turkey I've ever had. Dark and white meat were equally juicy. The skin was perfectly crispy, and the under-the-skin seasoning technique I use had infused every bite with serious flavor.
Plus, I get to giggle a bit every time I tell my guests what they're eating.
Recipe for Spatchcocked Chicken
Ingredients:
1 whole chicken
2-3 Tbsp olive oil
1 lemon
2-3 cloves of garlic
salt, pepper, rosemary, thyme, marjoram (or use whatever blend of herbs/spices you prefer)
1-2 Tbsp butter (optional)
Kitchen Tools
sturdy kitchen shears
latex gloves (optional) - I get kinda squeamish when handling raw chicken, so I always don a pair of latex gloves for the prep.
mini food-processor (optional)
Prepare the seasoning mixture by combining the oil, butter, salt, pepper, garlic and herbs in the food processor and processing to a thick paste. Alternatively, mince the garlic and stir together in a small bowl with the other ingredients. Half the lemon and squeeze juice of one half into the seasoning mixture. Stir to blend. Cut the whole lemon into thin slices. Set lemons and seasoning mixture aside.
Rinse the bird well, including the inner cavity. Place the bird on a stable surface or inside of a large baking pan, breast side down. Using the shears, cut vertically along either side of the backbone from one end of the cavity to the other. Depending on how good your shears are, this may be easy or it may be pretty hard. Use a bit of elbow grease. Rock the shears back and forth to break the bones on either side of the spine. Channel your inner Hannibal Lecter. Sip a Chianti. You'll get through it.
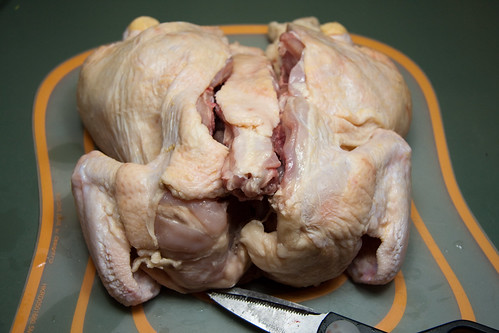
At the end of that gruesomeness, you should have a spineless bird in front of you, and a bird spine in your hand. Save the spine for making stock, or toss it out.
The secret to really crispy skin on a roasted bird is really dry skin to begin with. If you have time, let the bird rest in the fridge anywhere from 1-24 hours. I usually stick a few toothpicks into the bird and drape a towel or paper towels over them. I don't like the idea of uncovered raw chicken in the fridge, and the towel would stick to the skin if I didn't use the toothpicks. If you don't have time for all that, just blot as much moisture as you can from the skin and proceed with seasoning the bird.
Pre-heat oven to 400 degrees.
Run your hand gently under the skin covering the bird's breast, separating the skin from the flesh. Go all the way down to the thigh area, being careful not puncture the skin. Using a teaspoon or your hands, take small amounts of the seasoning mixture and rub all over the bird, under the skin. You may have extra seasoning mixture left over. Take lemon slices and slide them under the skin. I usually place 1 slice on each thigh, 2 on each breast, and tuck a lemon slice under each wing. Sprinkle more salt and pepper all over the skin. Place the bird in a roasting pan and cook for 40 minutes to 1-hour, until done (3 tests for doneness: juices run clear; leg/thigh moves easily in socket; thermometer inserted at thickest part of breast reads at least 160 degrees).

Note: When I tried this recipe with turkey, I did not de-spine my own turkey. I bought the bird from the Sweet Auburn Curb Market and had the butcher there make a cut on each side of the spine while the bird was still in its wrapper. I suggest you seek similar assistance for a larger bird.
cheers,
k Photo 1: via Leon Dale Photography
Photo 2: via Another Pint Please..., on Flickr
Photo 3: via that.turtle, on Flickr

4 cocktail recipes for halloween
Halloween marks the official start of the holiday season. These 4 Halloween-themed cocktail recipes will get your holiday season off to a spirited start.


For me, Halloween marks the official start of the holiday season. So let's celebrate the spirit of the season with some seasonal spirits, shall we?
Here are 4 Halloween-themed cocktail recipes that will get your holiday season off to a spirited start.
Halloween Cocktail Recipe #1 - Persephone Returns to Hades

halloween-cocktail-persephone
Any drink that involves a muddler deserves a long name just so people are aware of how much work goes into the dang thing. Plus, with winter approaching, the myth of Persephone and her underworld lover is fitting.
Ingredients:
1 part pomegranate juice
1 ½ parts gin or vodka
¾ part grenadine or simple syrup
2-3 mint or basil leaves
squeeze of fresh lime
To make: Add mint or basil leaves to glass, cover with grenadine. Muddle together. Add ice and remaining ingredients. Shake until chilled.
Serve with a cocktail straw in a high or lowball glass. Garnish with mint or basil leaves, cherry, mini plastic pitchfork or other hellish decorations.
Halloween Cocktail Recipe #2 - Bitches’ Brew
Ingredients:
port wine
stout beer
To make: Fill glass 1/3 of the way with port. Fill remainder of glass with chilled stout. Serve in a lowball glass or stemmed glass.
Halloween Cocktail Recipe #3 - Queen of the Damned
Ingredients:
1 part raspberry vodka OR vodka + raspberry liqueur
1 part coffee liqueur
2 parts champagne
red sugar for rim
To make: Shake first two ingredients together with ice, strain and serve in a martini glass rimmed with red sugar or with bloody candy rim. Fill rest of glass with champagne. Garnish with slice of blood orange (optional).
Halloween Cocktail Recipe #4 - Cool Autumn Breeze
Ingredients:
1 part gold rum
1 part sweet tea
splash of sour mix
squeeze of lemon
To make: Combine all ingredients in a lowball glass over ice. Stir well. Garnish with lemon or orange wedge.
cheers,
k
sipping mummy photo by: Passetti, on Flickr

music to cook to: C.O.L.O.U.R.S. mixtape by Fonzworth Bentley
A little-known but surprisingly good selection of musical collaborations from Fonzworth Bentley. Pairs perfectly with late-summer cookouts and AUC homecoming soundtracks.


Summer is officially over, but here in Georgia we’re still in that weird phase between summer and true fall that I call ‘second summer’. We’ll continue to see temperatures in the 70s and 80s during the day (without the stifling humidity, thank god), and we’ll really only notice it’s fall when the sun sets and temps reach a more autumnal range of 50s and 60s.
As always, I tend to find metaphors for life in nature. As I approach my mid-thirties, I kind of feel like I and all of my peers are entering into our own ‘second summers’. We still have the youthful exuberance and silliness of our 20s, we still like to party and dance like we used to as younguns but, thankfully we’ve traded the stifling atmosphere of the club for the more comfy atmosphere of house parties and private venue shindigs. Our priorities have shifted from student loans and changing majors to mortgage loans and major changes in career, marital, and social status. And though we may still like to booty-shake and drop it like it’s hot, we know better than to do so in public, for fear that someone from the office or the PTA might see.
While cleaning out some files from my digital library this week, I happened upon an obscure and almost-forgotten track I’d saved a couple of years ago. The light party track, “Everybody”, was an unexpected yet effective collaboration among Fonzworth Bentley, Andre 3000, Kanye West, and Sa-Ra Creative Partners. And as you can tell from the video, these guys had a lot of fun working together on it.
As it turns out, “Everybody” is just 1 selection from a 17-track mixtape entitled, “Fonzworth Bentley Presents C.O.L.O.U.R.S. by Derek Watkins”. The mixtape features Fonzworth’s musical collaborations with several heavy hitters, like U.G.K., Faith Evans, Lil’ Wayne and Anthony Hamilton – all artists who came into their own in the 90s. The mixtape obviously never received a lot of press or any airplay; I hadn’t even heard the entire playlist until this week. But as I listened, I realized that the C.O.L.O.U.R.S. mixtape was the perfect ‘second summer’ soundtrack, especially for us Georgia born and bred folk. Once you have a listen, I think you’ll agree that it conjures up all the good times and the party-days of southern summers past, and would make a worthwhile addition to your next house party or an appropriate backdrop for your next “remember when we used to…” conversation.
This musical selection is ideal for:
Georgia representers, A-town stunnas, anybody who ever yelled ‘yeek’ at the club or the talent show, those who partied and/or studied in the AUC in the 90s, and everybody who knew Fonzworth Bentley when he was a Morehouse student named Derek Watkins,
This musical selection pairs perfectly with:
A late afternoon weekend barbecue featuring turkey burgers, veggie skewers and portobello mushroom caps instead of the pork ribs, mystery-meat hot dogs, and beef burgers we downed without consequence when we were younger. Serve with a nice pinot noir or craft beer – not the Icehouse and Arbor Mist that were more appropriate for our as-yet-unexpanded drinking palates and budgets. Okay, okay. You can bring back the old school hunch-punch if you want, but just this once. ;-)
Stream the C.O.L.O.U.R.S. mixtape for free
Download free tracks from the C.O.L.O.U.R.S. mixtape
Purchase the mixtape on ![]()
cheers y’all,
k

perfect recipes from my imperfect neighborhood

sign-art-2-adamrice
Talk to someone in intown Atlanta for longer than 5 minutes, and you’re going to get asked the question. You may even ask it yourself just to get it over and done with. For Atlanta intowners, the question is the equivalent of the doggie butt sniff. Sure, it may seem a little intimate for a first meeting, but it’s expected amongst our kind.
“So, what neighborhood do you live in?”
About half of the time, the response I get when I answer to the question goes something like this:
“Oh. *gulp* That’s nice.”
You see, I live in a transitional neighborhood. Which in ATL-speak translates as:
A neighborhood – primarily occupied by low-income and elderly blacks – with severely depressed property values and higher-than-average crime rates that is slowly becoming populated by middle-class professionals with active social lives who want a good deal for their real estate dollar.
Living in a neighborhood like that ain’t no bed of roses. Hm. On second thought, it sorta is a bed of roses. There’s a lot of sweet-smelling good things about the neighborhood - neighbors who actually talk to each other, kids playing in the streets, and friendly older people who’ve lived here for multiple generations. There’s also our little community garden.
On a recent visit, I picked a small handful of dill from the shared herb garden a few streets over, simply because it smelled so good. As soon as I had a whiff, I got an instant craving for salmon and rushed off to get some. One of my favorite ways to eat salmon is pan seared with a little dill and lemon butter. I especially love the crispy, seared crust you get when you order pan seared salmon at a restaurant, but wasn’t exactly sure how to achieve the same result at home. A quick search on the interwebs though, and I was in business.
Perfect Pan-Seared Salmon with Dill

perfect-pan-seared-salmon
Ingredients:
2 salmon filets, skin on
1-2 sprigs of fresh dill, roughly chopped
1 clove garlic or 1 shallot, chopped
juice of 1 lemon
1 ½ tbsp butter, softened
1-2 tbsp cold butter
olive oil
salt and pepper
Pat the salmon filets with a paper towel to be sure they’re dry. Season the salmon with salt and pepper. Spread softened butter on both sides of the filets. Heat the olive oil in a nonstick skillet on medium-high. Add filets, skin side down and cook for 5 minutes. Flip with a spatula and cook for another 2 to 3 minutes (for medium doneness). Remove salmon and set aside.
Turn the heat down to medium, add the garlic or shallot and sautee until light golden brown. Add lemon juice to the pan, using the spatula to scrape up any bits left behind. Remove the pan from heat, add a tablespoon of cold butter, and stir constantly until it melts completely. Add the dill, and salt and pepper to taste. Top salmon fillets with lemon slices. Pour the butter sauce over the salmon filets and serve.
Thanks to the Gastronomer’s Guide for this technique. It yielded the best salmon I’ve ever cooked at home. A golden crust on both sides, and the neighborhood dill was the perfect accompaniment.
But back to the bed of roses that is my neighborhood. In addition to the often-overlooked flowers that come with living here, there are the all-too-obvious thorny frustrations. We have less than our fair share of quality services, restaurants, and retail outlets, and more than our fair share of shady characters, and absentee landlords. Not too long ago, one of our neighbors’ homes was burgled. Since they don’t make Hallmark cards for such occasions, and since my neighbors had not-so-subtly hinted how much they loved fried chicken, I felt the neighborly thing to do was to whip up a batch for them. Sinking your teeth into some crispy, juicy fried chicken can help ease the greatest of pains. Even the pain that comes from some roguish bastard stealing your Xbox.
Perfect Buttermilk Fried Chicken
Ingredients:
3 lbs of cut chicken pieces
1 carton of buttermilk
¼ cup mixture of ground herbs of your choice (I use: marjoram, thyme, onion powder, garlic powder, black pepper, paprika, cayenne pepper, and nutmeg)
1 onion, sliced
3 cups of flour
1-2 tbsp seasoned salt
2 cups of canola oil
a large paper bag
Rinse and pat dry the chicken pieces. Liberally season with the ground herb mixture. If you really want to get up close and personal with the bird, rub the seasonings into and under the skin. Place the seasoned chicken in a large bowl and cover with buttermilk. Cover the bowl and refrigerate overnight (8-12 hours).
The next day, add the flour and seasoned salt to a large paper or plastic bag. Drain the chicken in a colander, and add a piece at a time to the bag, shaking well before adding the next piece. Let the chicken rest from 15 minutes to an hour (the longer the chicken rests, the crispier the outer skin will be).
Heat canola oil in a heavy skillet on medium-high. The oil is ready when a pinch of flour sizzles instantly when dropped in the oil. Add the chicken a piece at a time until the pan is full, but not too crowded. Cook for 12-15 minutes on one side, adjusting the heat as necessary so that the skin achieves a golden brown color, but doesn’t burn. Using tongs, flip to the other side and cook for another 10-12 minutes or until golden brown and juices run clear when you pierce the chicken. Remove chicken and allow to cool on a rack or drain on paper towels. If you have problems getting the chicken done on the inside, finish cooking the chicken in the oven at 375 degrees until desired doneness is achieved.

kitteh-luvs-chikn
The amount of time invested in making this chicken is absolutely worth it. The result is tender, juicy, well-seasoned chicken with a crispy, golden crust. My neighbors seemed to really like it, and I like to think that it helped them forget about the recent theft for just a few finger-licking moments.
Yep. My little neighborhood is certainly no Pleasantville, but some days it’s absolutely perfect.
cheers,
k